是什么

由于历史遗留原因,Nova认为资源全部是由计算节点提供,所以在报告某些资源使用时,Nova仅仅通过查询数据库中不同计算节点的数据,简单的做累加计算得到使用量和可用资源情况,这一定不是严谨科学的做法,于是,在N版中,Nova引入了Placement API,这是一个单独的RESTful API和数据模型,用于管理和查询资源提供者的资源存量、使用情况、分配记录等等,以提供更好、更准确的资源跟踪、调度和分配的功能。

有什么

代码目录

由于Nova Placement API是单独剥离出来的RESTful API,同时也有自己单独的Endpoint,并且与Nova API服务启动在不同的端口,单独提供服务,那么,在代码目录上来看,也是相对独立的,其代码实现均在/nova/api/openstack/placement/下,那么我看来看一下Nova Placement API的代码目录结构:

F:nova ZH.F$ tree  -C  api/openstack/placement
api/openstack/placement
├── __init__.py
├── auth.py
├── deploy.py
├── handler.py
├── handlers
│   ├── __init__.py
│   ├── aggregate.py
│   ├── allocation.py
│   ├── allocation_candidate.py
│   ├── inventory.py
│   ├── resource_class.py
│   ├── resource_provider.py
│   ├── root.py
│   ├── trait.py
│   └── usage.py
├── lib.py
├── microversion.py
├── policy.py
├── requestlog.py
├── rest_api_version_history.rst
├── schemas
│   ├── __init__.py
│   ├── aggregate.py
│   ├── allocation.py
│   ├── allocation_candidate.py
│   ├── inventory.py
│   ├── resource_class.py
│   ├── trait.py
│   └── usage.py
├── util.py
├── wsgi.py
└── wsgi_wrapper.py

其中,在api/openstack/placement/schemas目录下,可以看到基本数据模型的schema,不过resource privoder的schema定义在了api/openstack/placement/handlers/resource_provider.py中。下面,对照schema,我们对其中的一些概念进行了解。

Nova Placement API中的一些概念

Resource Provider

即资源提供者,通过其schema可以看到结构比较简单,只包含UUID和RP(Resource Provider简写,下同)的一些基本信息,比如name:

GET_RPS_SCHEMA_1_0 = {
"type": "object",
"properties": {
"name": {
"type": "string"
},
"uuid": {
"type": "string",
"format": "uuid"
}
},
"additionalProperties": False,
}

资源提供者可能是一个计算节点,也可能是一个共享存储池或者一个IP分配池子,那么不同的RP,提供的资源多种多样,于是就引入了Resource Class,即资源类型的概念。

Resource Class

即资源类型,比如计算节点提供的资源可能是CPU、内存、PCI设备、本地临时磁盘等等。每种被消费的资源都会按照类别进行标注和跟踪。

之所以引入这个概念,目的是解决Nova中hard-coded的资源类型扩展性问题,比如CPU资源,可能记录在Instance对象的vcpus字段中,那么之后再增加新的资源类型,都需要修改数据表,而修改数据表的过程都会停机维护,给系统带来许多downtime,这是不可接受的。

Placement API提供了一些标准资源类别,如:

  • VCPU
  • MEMORY_MB
  • DISK_GB
  • PCI_DEVICE
  • NUMA_SOCKET
  • NUMA_CORE
  • NUMA_THREAD
  • IPV4_ADDRESS

注:数据来自BP:Introduce resource classes

除了以上标准资源类别,Placement API还在O版中为RP增加了自定义Resource Class的能力,比如自动以的FPGA、裸机调度等等。

Inventory

即库存,存量。用于记录超配比、资源总量、存量、步长(step_size)、最小和最大单位等信息,可以看一下它的schema:

BASE_INVENTORY_SCHEMA = {
"type": "object",
"properties": {
"resource_provider_generation": {
"type": "integer"
},
"total": {
"type": "integer",
"maximum": db.MAX_INT,
"minimum": 1,
},
"reserved": {
"type": "integer",
"maximum": db.MAX_INT,
"minimum": 0,
},
"min_unit": {
"type": "integer",
"maximum": db.MAX_INT,
"minimum": 1
},
"max_unit": {
"type": "integer",
"maximum": db.MAX_INT,
"minimum": 1
},
"step_size": {
"type": "integer",
"maximum": db.MAX_INT,
"minimum": 1
},
"allocation_ratio": {
"type": "number",
"maximum": db.SQL_SP_FLOAT_MAX
},
},
"required": [
"total",
"resource_provider_generation"
],
"additionalProperties": False
}

其中的resource_provider_generation字段,是一个一致性视图的标志位,在获取RP列表时的generation功能是相同的,这就是CAS(Compare and swap),即乐观锁技术——当多个线程尝试使用CAS同时更新同一个变量时,只有其中一个线程能更新变量的值,而其它线程都失败,失败的线程并不会被挂起,而是被告知这次竞争中失败,并可以再次尝试。

Usage

即用量,使用情况。可以查看某个RP的使用情况,也可以查看项目下某用户的资源使用情况。

Aggregate

在Ocata版本,社区开始将nova-scheduler服务与Placement API进行集成,并在scheduler进行了一些修改,使用Placement API进行满足一些基本资源请求条件的计算节点过滤。添加了aggregates,来提供resource provider的分组机制。

Allocation

即已分配量,某一个RP对某一个资源消费者(即某个实例)所分配的资源。

Allocation-candidate

即分配的候选者(资源提供者),举个例子,用户说,我需要1个VCPU,512MB内存,1GB磁盘的资源,Placement你帮我找找看看,有没有合适的资源。然后Placement就要做各种处理,反馈给用户,哪些是可以分配的候选资源提供者。

Trait

字面意思,特征,特性。ResourceProvider和Allocation可以在定量的角度,控制和管理boot虚机请求,然而我们还需要从定性的角度来区分资源,最经典的例子是当我们创建虚机时,需要向不同的RP请求磁盘资源,用户可能请求80GB的磁盘,但也可能请求80GB的SSD。这就是Trait的意义。

数据库及数据表

目前我安装的Pike版本的Packstack环境中,能看到有一个nova_placement数据库,但是没有任何表(也许是社区希望能把placement相关的表放到这个数据库中?),Placement对应的数据库用的还是nova_api

MariaDB [nova_placement]> use nova_api;
Reading table information for completion of table and column names
You can turn off this feature to get a quicker startup with -A

Database changed
MariaDB [nova_api]> show tables;
+------------------------------+
| Tables_in_nova_api |
+------------------------------+
| aggregate_hosts |
| aggregate_metadata |
| aggregates |
| allocations |
| build_requests |
| cell_mappings |
| consumers |
| flavor_extra_specs |
| flavor_projects |
| flavors |
| host_mappings |
| instance_group_member |
| instance_group_policy |
| instance_groups |
| instance_mappings |
| inventories |
| key_pairs |
| migrate_version |
| placement_aggregates |
| project_user_quotas |
| projects |
| quota_classes |
| quota_usages |
| quotas |
| request_specs |
| reservations |
| resource_classes |
| resource_provider_aggregates |
| resource_provider_traits |
| resource_providers |
| traits |
| users |
+------------------------------+

可以从表明上看到那些是Placement相关的表,这里就不展开了。

初始化及加载方式

我们前面提到Nova Placement API是单独的RESTful API,那么是如何进行初始化的呢?带着这个问题,我们先查看nova的setup.cfg,其中配置了wsgi_scripts如下:

wsgi_scripts =
nova-placement-api = nova.api.openstack.placement.wsgi:init_application
nova-api-wsgi = nova.api.openstack.compute.wsgi:init_application
nova-metadata-wsgi = nova.api.metadata.wsgi:init_application

其中可以看到nova-placement-api的初始化来自 nova.api.openstack.placement.wsgi.init_application ,代码如下:

def init_application():
# initialize the config system
conffile = _get_config_file()
config.parse_args([], default_config_files=[conffile])

# initialize the logging system
setup_logging(conf.CONF)

# dump conf if we're at debug
if conf.CONF.debug:
conf.CONF.log_opt_values(
logging.getLogger(__name__),
logging.DEBUG)

# build and return our WSGI app
return deploy.loadapp(conf.CONF)

其中在最后构造WSGI app并返回,即调用了deploy.loadapp(conf.CONF):

def loadapp(config, project_name=NAME):
application = deploy(config, project_name)
return application
def deploy(conf, project_name):
"""Assemble the middleware pipeline leading to the placement app."""
...
application = handler.PlacementHandler()
...
for middleware in (microversion_middleware,
fault_wrap,
request_log,
context_middleware,
auth_middleware,
cors_middleware,
req_id_middleware,
):
if middleware:
application = middleware(application)

return application

而这里的handler.PlacementHandler()就是我们的Placement的API入口:

class PlacementHandler(object):
"""Serve Placement API.
Dispatch to handlers defined in ROUTE_DECLARATIONS.
"""

def __init__(self, **local_config):
# NOTE(cdent): Local config currently unused.
self._map = make_map(ROUTE_DECLARATIONS)

def __call__(self, environ, start_response):
# All requests but '/' require admin.
if environ['PATH_INFO'] != '/':
...

可以看到,PlacementHandler在__init__中根据路由定义构造了map,同时在__call__中对请求进行dispatch。这就是一个典型的WSGI应用:

WSGI application is a callable object (a function, method, class, or an instance with a __call__ method) that accepts two positional arguments: WSGI environment variables and a callable with two required positional arguments which starts the response;

找到了初始化,那么Placement API加载和启动是如何实现的?

首先,nova-placement-api是单独的脚本,在httpd中启动,与keystone(在12年就完成了WSGI化,参见>>传送门)类似,通过systemctl status httpd是可以看到的:

[root@f-packstack ~(keystone_admin)]# systemctl status httpd
● httpd.service - The Apache HTTP Server
Loaded: loaded (/usr/lib/systemd/system/httpd.service; enabled; vendor preset: disabled)
Active: active (running) since Fri 2018-02-02 09:17:51 CST; 1 weeks 0 days ago
Docs: man:httpd(8)
man:apachectl(8)
Process: 4087 ExecReload=/usr/sbin/httpd $OPTIONS -k graceful (code=exited, status=0/SUCCESS)
Main PID: 1309 (httpd)
Status: "Total requests: 0; Current requests/sec: 0; Current traffic: 0 B/sec"
CGroup: /system.slice/httpd.service
├─ 1309 /usr/sbin/httpd -DFOREGROUND
├─ 4108 keystone-admin -DFOREGROUND


├─ 4109 keystone-admin -DFOREGROUND
├─ 4110 keystone-admin -DFOREGROUND
├─ 4111 keystone-admin -DFOREGROUND


├─ 4112 keystone-main -DFOREGROUND
├─ 4113 keystone-main -DFOREGROUND
├─ 4114 keystone-main -DFOREGROUND
├─ 4115 keystone-main -DFOREGROUND
├─ 4116 placement_wsgi -DFOREGROUND
├─ 4117 placement_wsgi -DFOREGROUND
├─ 4118 placement_wsgi -DFOREGROUND
├─ 4119 placement_wsgi -DFOREGROUND
├─ 4121 /usr/sbin/httpd -DFOREGROUND
├─ 4122 /usr/sbin/httpd -DFOREGROUND

知道是在httpd启动的,我们去查看配置文件目录:

[root@f-packstack ~(keystone_admin)]# ll /etc/httpd/conf.d/
total 36
-rw-r-----. 1 root root 136 Jan 12 17:46 00-nova-placement-api.conf
-rw-r--r--. 1 root root 943 Jan 12 17:48 10-keystone_wsgi_admin.conf
-rw-r--r--. 1 root root 938 Jan 12 17:48 10-keystone_wsgi_main.conf
-rw-r--r--. 1 root root 941 Jan 12 17:49 10-placement_wsgi.conf
-rw-r--r--. 1 root root 697 Jan 12 17:48 15-default.conf
-rw-r--r--. 1 root root 2926 Oct 20 04:39 autoindex.conf
-rw-r--r--. 1 root root 366 Oct 20 04:39 README
-rw-r--r--. 1 root root 1252 Oct 20 00:44 userdir.conf
-rw-r--r--. 1 root root 824 Oct 20 00:44 welcome.conf

其中,10-placement_wsgi.conf 中定义了WSGIScriptAllias:

...
WSGIProcessGroup placement-api
WSGIScriptAlias /placement "/var/www/cgi-bin/nova/nova-placement-api”
...

也就是说,url为/placement/xxx的请求会使得httpd服务运行定义在/var/www/cgi-bin/nova/nova-placement-api中的WSGI应用,在这个文件中,我们会看到:

from nova.api.openstack.placement.wsgi import init_application

if __name__ == "__main__”:
import argparse
import socket
import sys
import wsgiref.simple_server as wss

server = wss.make_server(args.host, args.port, init_application())
...

也就对应了前面提到的PlacementHandler中的nova.api.openstack.placement.wsgi.init_application,至此,我们就了解了Nova Placement API的初始化和加载方式。

API路由定义

上一小节提到了PlacementHandler初始化时,根据路由定义构造了map映射,我们就来看下文件api/openstack/placement/handler.py中的APIROUTE_DECLARATIONS:

# URLs and Handlers
# NOTE(cdent): When adding URLs here, do not use regex patterns in
# the path parameters (e.g. {uuid:[0-9a-zA-Z-]+}) as that will lead
# to 404s that are controlled outside of the individual resources
# and thus do not include specific information on the why of the 404.
ROUTE_DECLARATIONS = {
'/': {
'GET': root.home,
},
# NOTE(cdent): This allows '/placement/' and '/placement' to
# both work as the root of the service, which we probably want
# for those situations where the service is mounted under a
# prefix (as it is in devstack). While weird, an empty string is
# a legit key in a dictionary and matches as desired in Routes.
'': {
'GET': root.home,
},
'/resource_classes': {
'GET': resource_class.list_resource_classes,
'POST': resource_class.create_resource_class
},
'/resource_classes/{name}': {
'GET': resource_class.get_resource_class,
'PUT': resource_class.update_resource_class,
'DELETE': resource_class.delete_resource_class,
},
'/resource_providers': {
'GET': resource_provider.list_resource_providers,
'POST': resource_provider.create_resource_provider
},
'/resource_providers/{uuid}': {
'GET': resource_provider.get_resource_provider,
'DELETE': resource_provider.delete_resource_provider,
'PUT': resource_provider.update_resource_provider
},
'/resource_providers/{uuid}/inventories': {
'GET': inventory.get_inventories,
'POST': inventory.create_inventory,
'PUT': inventory.set_inventories,
'DELETE': inventory.delete_inventories
},
'/resource_providers/{uuid}/inventories/{resource_class}': {
'GET': inventory.get_inventory,
'PUT': inventory.update_inventory,
'DELETE': inventory.delete_inventory
},
'/resource_providers/{uuid}/usages': {
'GET': usage.list_usages
},
'/resource_providers/{uuid}/aggregates': {
'GET': aggregate.get_aggregates,
'PUT': aggregate.set_aggregates
},
'/resource_providers/{uuid}/allocations': {
'GET': allocation.list_for_resource_provider,
},
'/allocations': {
'POST': allocation.set_allocations,
},
'/allocations/{consumer_uuid}': {
'GET': allocation.list_for_consumer,
'PUT': allocation.set_allocations_for_consumer,
'DELETE': allocation.delete_allocations,
},
'/allocation_candidates': {
'GET': allocation_candidate.list_allocation_candidates,
},
'/traits': {
'GET': trait.list_traits,
},
'/traits/{name}': {
'GET': trait.get_trait,
'PUT': trait.put_trait,
'DELETE': trait.delete_trait,
},
'/resource_providers/{uuid}/traits': {
'GET': trait.list_traits_for_resource_provider,
'PUT': trait.update_traits_for_resource_provider,
'DELETE': trait.delete_traits_for_resource_provider
},
'/usages': {
'GET': usage.get_total_usages,
},
}

怎么用

如何部署

在官方文档中提到,placement api服务必须在升级到14.0.0,即N版后,升级到15.0.0,即O版之前进行部署。nova-compute服务中的resource tracker需要获取placement的资源提供者存量和分配信息(这部分信息将在O版中由nova-scheduler使用)。

  1. 部署API服务 - Placement API目前还是在nova中进行开发,但是设计上是相对独立的,以便将来分离出来成为单独的项目。作为一个单独的WSGI应用,可使用Apahce2或者Nginx部署API服务。
  2. 同步数据库 - 升级N版时,需要手动执行nova-manage api_db sync命令进行数据库同步,这样Placement相关的数据表就会被创建出来
  3. 在keystone中创建具有admin角色的placement service user,同时更新服务目录,配置单独的endpoint.
  4. 配置nova.conf中[placement]部分,并重启nova-compute服务。不过对于我们P版,经过了O版的一系列功能补齐,尤其是在O版中,如果在nova.conf中不配置[placement]部分的内容,就无法启动nova-compute服务。

The nova-compute service will fail to start in Ocata unless the [placement] section of nova.conf on the compute is configured.

更多部署相关的可参见官方文档,>>传送门

OSC Placement Plugin

从前面的API路由定义,我们可以看到,目前支持了这么些功能,那么我们可以简单的用一下,第一个想到的是cURL命令,我们可以使用该命令模拟发起请求,调用Placement API,比如查看resource providers list,首先我们获取token:

# 首先得到auth token
curl -d '{"auth": {"tenantName": "admin", "passwordCredentials": {"username": "admin", "password": "1234qwer"}}}' \
-H "Content-type: application/json" \
http://localhost:5000/v2.0/tokens

...
{
"issued_at": "2018-02-07T07:40:07.000000Z",
"expires": "2018-02-07T08:40:07.000000Z",
"id": "gAAAAABaeq1XrNDoU_F_iRk8uC0lOxYpyzLMW_YRs_ggJHuF1OpGHBN-pymQut-Bp2Er-J4XkYfQkMdJbRlBIBhq4wfhZMHZvag1itnL6Q-TSWhOn7uZpdQsYqqJDmwgtzCm-hcpg17IwN5FZSanCbcy6S96YZ0Zci5STWNka40861Mn8UQ2yRE",
"tenant": {
"description": "admin tenant",
"enabled": true,
"id": "6387fc88b3064149a12eb5b58669e0b2",
"name": "admin"
}
}

# token的获取方式,还可以用OSC命令:
openstack token issue | grep ' id' | awk '{print $4}'
...


#得到token之后,构造请求,查看resource providers list:
curl -X GET /
-H 'x-auth-token:gAAAAABaeq1XrNDoU_F_iRk8uC0lOxYpyzLMW_YRs_ggJHuF1OpGHBN-pymQut-Bp2Er-J4XkYfQkMdJbRlBIBhq4wfhZMHZvag1itn17IwN5FZSanCbcy6S96YZ0Zci5STWNka40861Mn8UQ2yRE’ /
http://192.168.122.105:8778/placement/resource_providers

#得到resources providers list
{
"resource_providers": [
{
"generation": 30,
"uuid": "4cae2ef8-30eb-4571-80c3-3289e86bd65c",
"links": [
{
"href": "/placement/resource_providers/4cae2ef8-30eb-4571-80c3-3289e86bd65c",
"rel": "self"
},
{
"href": "/placement/resource_providers/4cae2ef8-30eb-4571-80c3-3289e86bd65c/inventories",
"rel": "inventories"
},
{
"href": "/placement/resource_providers/4cae2ef8-30eb-4571-80c3-3289e86bd65c/usages",
"rel": "usages"
}
],
"name": "f-packstack"
}
]
}

其中的generation字段,是一个一致性视图的标志位,跟获取RP的inventories中的resource_provider_generation功能是相同的,其实算作是乐观锁技术,即CAS,Compare and swap,当多个线程尝试使用CAS同时更新同一个变量时,只有其中一个线程能更新变量的值,而其它线程都失败,失败的线程并不会被挂起,而是被告知这次竞争中失败,并可以再次尝试。

下面来一个获取aggregate和inventories的示例,注意,aggregate的API是在1.1版本中实现的,所以要在请求头指定OpenStack-API-Version: placement 1.1

curl -g -i -X GET http://192.168.122.105:8778/placement/resource_providers/4cae2ef8-30eb-4571-80c3-3289e86bd65c/aggregates \
-H "User-Agent: python-novaclient" \
-H "Accept: application/json" \
-H "X-Auth-Token: gAAAAABaf5nafUZyFTl_pztozfB65wkP0c26HQqrxRgAiJGsxY8g743LxFOZEI3bF_l37xh0UajbF5nQ1kLYGAonOGphV4AivXgYMUOJ84uGrHjpC60NlmNzzQ3lJGVJb-pNxQw74WsMOc9I0D2B5Mzmf2OgDeictae5f0UFgTR9DFb_vaWCWQ4" \
-H "OpenStack-API-Version: placement 1.1"
HTTP/1.1 200 OK
Date: Fri, 15 Sep 2017 09:35:21 GMT
Server: Apache/2.4.18 (Ubuntu)
Content-Length: 18
Content-Type: application/json
OpenStack-API-Version: placement 1.1
vary: OpenStack-API-Version
x-openstack-request-id: req-ab28194f-8389-40a1-9a2b-a94dbc792573
Connection: close

{"aggregates": []}


curl -g -i -X GET http://192.168.122.105:8778/placement/resource_providers/4cae2ef8-30eb-4571-80c3-3289e86bd65c/inventories \
-H "User-Agent: python-novaclient" \
-H "Accept: application/json" \
-H 'x-auth-token:gAAAAABae6lX26bp4PEVHCac0cjFnNl18W8DjeQKXDYvuKP4drRJ8t6DC-9uzcCm4E9Xf7NjqSqkRX6WGsE3qHmpAt7GmIu1SrLCtyEOVM2IQP5XLNrwMekGGrzQ_ADOaSTc9XpPpCYyYwzT-zCAvWG-T9T6Ip4l3zHWLwNBBPrm35gBZVZeslQ' \

{
"resource_provider_generation": 30,
"inventories": {
"VCPU": {
"allocation_ratio": 16,
"total": 4,
"reserved": 0,
"step_size": 1,
"min_unit": 1,
"max_unit": 128
},
"MEMORY_MB": {
"allocation_ratio": 1.5,
"total": 8095,
"reserved": 512,
"step_size": 1,
"min_unit": 1,
"max_unit": 8095
},
"DISK_GB": {
"allocation_ratio": 1,
"total": 49,
"reserved": 0,
"step_size": 1,
"min_unit": 1,
"max_unit": 49
}
}
}

贴心的社区妥妥的想到了如何可以方便用户操作Placement API,所以开发了一个OpenStackClient Plugin,即osc-placement,需要我们手动安装使用:

$ pip install osc-placement

有了OSC placement commands,我们不再需要使用curl命令模拟HTTP请求,并且可以非常轻松的进行操作:

[root@f-packstack ~(keystone_admin)]# openstack --debug resource provider list
...
http://192.168.122.105:8778 "GET /placement/resource_providers HTTP/1.1" 200 185
RESP: [200] Date: Thu, 08 Feb 2018 05:59:56 GMT Server: Apache/2.4.6 (CentOS) OpenStack-API-Version: placement 1.0 vary: OpenStack-API-Version,Accept-Encoding x-openstack-request-id: req-c6077c19-ca05-4cab-95fa-6129ff989400 Content-Encoding: gzip Content-Length: 185 Keep-Alive: timeout=15, max=100 Connection: Keep-Alive Content-Type: application/json
RESP BODY: {"resource_providers": [{"generation": 30, "uuid": "4cae2ef8-30eb-4571-80c3-3289e86bd65c", "links": [{"href": "/placement/resource_providers/4cae2ef8-30eb-4571-80c3-3289e86bd65c", "rel": "self"}, {"href": "/placement/resource_providers/4cae2ef8-30eb-4571-80c3-3289e86bd65c/inventories", "rel": "inventories"}, {"href": "/placement/resource_providers/4cae2ef8-30eb-4571-80c3-3289e86bd65c/usages", "rel": "usages"}], "name": "f-packstack"}]}

GET call to placement for http://192.168.122.105:8778/placement/resource_providers used request id req-c6077c19-ca05-4cab-95fa-6129ff989400
+--------------------------------------+-------------+------------+
| uuid | name | generation |
+--------------------------------------+-------------+------------+
| 4cae2ef8-30eb-4571-80c3-3289e86bd65c | f-packstack | 30 |
+--------------------------------------+-------------+------------+
clean_up ListResourceProvider:
END return value: 0

当然还有很多其他的命令,有兴趣的可以尝试玩一下。

划重点:Nova调度与Placement API的结合

首先来一张图,来认识一下在P版中,创建一台虚机过程中各个服务之间的调用/调度关系:

可以看到,在nova-scheduler与Placement API的交互过程中,有两部分:

  1. Get allocation candidates
  2. Claim Resources
    下面,我们结合代码详细的讲述一下调度过程。

Get allocation candidates

目前在调度时,nova-conductor在nova.conductor.manager.ComputeTaskManager#_schedule_instances中调用了方法nova.scheduler.client.SchedulerClient#select_destinations

@utils.retry_select_destinations
def select_destinations(self, context, spec_obj, instance_uuids,
return_objects=False, return_alternates=False):
return self.queryclient.select_destinations(context, spec_obj,
instance_uuids, return_objects, return_alternates)

其中SchedulerClient又调用了SchedulerQueryClient,即调用了nova.scheduler.client.query.SchedulerQueryClient#select_destinations方法:

def select_destinations(self, context, spec_obj, instance_uuids,
return_objects=False, return_alternates=False):
return self.scheduler_rpcapi.select_destinations(context, spec_obj,
instance_uuids, return_objects, return_alternates)

在该方法中发起RPC调用,调用了nova.scheduler.manager.SchedulerManager#select_destinations方法:

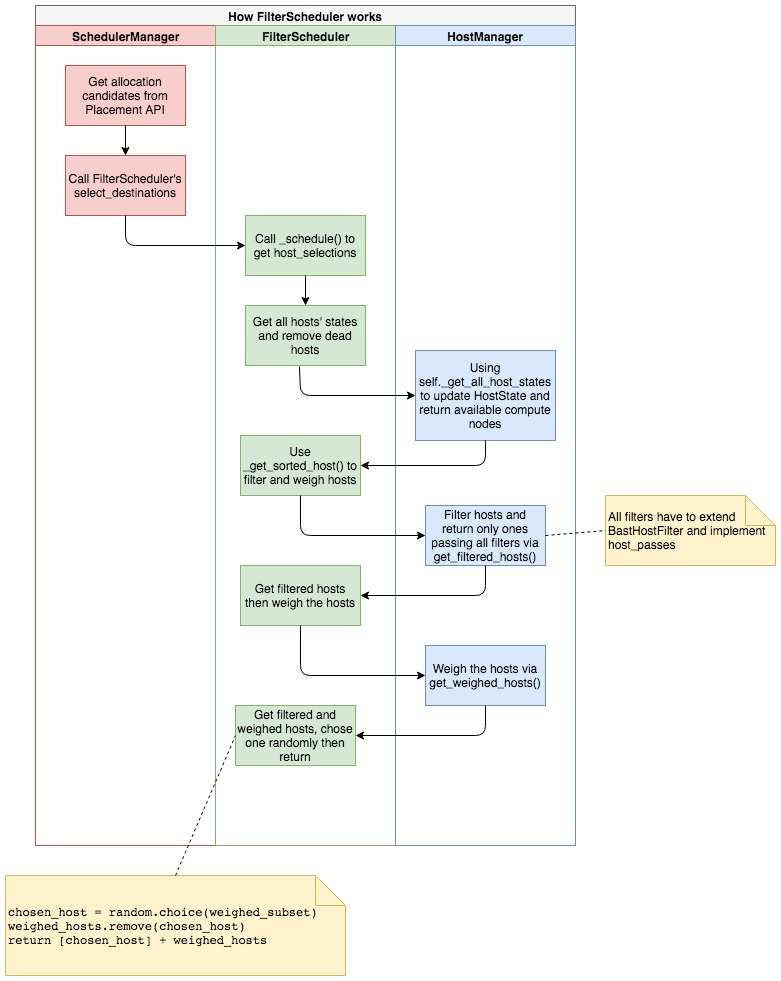
@messaging.expected_exceptions(exception.NoValidHost)
def select_destinations(self, ctxt, request_spec=None,
filter_properties=None, spec_obj=_sentinel, instance_uuids=None,
return_objects=False, return_alternates=False):
LOG.debug("Starting to schedule for instances: %s", instance_uuids)
...
# 其中USES_ALLOCATION_CANDIDATES默认值为True,
# 即表示使用Nova Placement API来选取资源分配候选者
if self.driver.USES_ALLOCATION_CANDIDATES:
res = self.placement_client.get_allocation_candidates(ctxt,
if res is None:
alloc_reqs, provider_summaries, allocation_request_version = (
None, None, None)
else:
(alloc_reqs, provider_summaries,
allocation_request_version) = res
if not alloc_reqs:
LOG.debug("Got no allocation candidates from the Placement "
"API. This may be a temporary occurrence as compute "
"nodes start up and begin reporting inventory to "
"the Placement service.")
raise exception.NoValidHost(reason="")
else:
# Build a dict of lists of allocation requests, keyed by
# provider UUID, so that when we attempt to claim resources for
# a host, we can grab an allocation request easily
alloc_reqs_by_rp_uuid = collections.defaultdict(list)
for ar in alloc_reqs:
for rp_uuid in ar['allocations']:
alloc_reqs_by_rp_uuid[rp_uuid].append(ar)

# Only return alternates if both return_objects and return_alternates
# are True.
return_alternates = return_alternates and return_objects
# self.driver在这里,我们配置使用的是FilterScheduler,
# 即又调用了nova.scheduler.filter_scheduler.FilterScheduler#select_destinations
# 这个我们后面会提到
selections = self.driver.select_destinations(ctxt, spec_obj,
instance_uuids, alloc_reqs_by_rp_uuid, provider_summaries,
allocation_request_version, return_alternates)
# If `return_objects` is False, we need to convert the selections to
# the older format, which is a list of host state dicts.
if not return_objects:
selection_dicts = [sel[0].to_dict() for sel in selections]
return jsonutils.to_primitive(selection_dicts)
return selections

我们先来说,这里调用的Placement API,发起一个GET请求,获取Allocation Candidates。

注:没有找到这个API对应的OSC命令,所以我们使用curl命令进行模拟。

另,Allocation candidates API requests are availiable starting from version 1.10.

# 获取token
[root@f-packstack ~(keystone_admin)]# openstack token issue | grep ' id' | awk '{print $4}'
gAAAAABajn5nIXMCkZQBwcl7LdqeCV8pOuFSN4ltIUa9GcJ_PO4x920rpw5fwz43BZ8rkKIVlWF1OHfDNs1GRhqhoUHPNkEU6SRNK8G1BFKoHKD4nDJESGhSMrGwDGTIsYeaANqM2D_48tUo_pY0eqCD8iEcRDHi-QCH-c_t_m44So0cHvlXtdE
# 使用curl命令发起GET请求,请求参数是resources=DISK_GB:1,MEMORY_MB:512,VCPU:1
curl -g -i -X GET http://192.168.122.105:8778/placement/allocation_candidates?resources=DISK_GB:1,MEMORY_MB:512,VCPU:1 \
-H "User-Agent: python-novaclient" \
-H "Accept: application/json" \
-H "X-Auth-Token: gAAAAABajn5nIXMCkZQBwcl7LdqeCV8pOuFSN4ltIUa9GcJ_PO4x920rpw5fwz43BZ8rkKIVlWF1OHfDNs1GRhqhoUHPNkEU6SRNK8G1BFKoHKD4nDJESGhSMrGwDGTIsYeaANqM2D_48tUo_pY0eqCD8iEcRDHi-QCH-c_t_m44So0cHvlXtdE" \
-H "OpenStack-API-Version: placement 1.10"

HTTP/1.1 200 OK
Date: Thu, 22 Feb 2018 08:55:27 GMT
Server: Apache/2.4.6 (CentOS)
OpenStack-API-Version: placement 1.10
vary: OpenStack-API-Version,Accept-Encoding
x-openstack-request-id: req-234db1eb-1386-4e89-99bd-c9269270c603
Content-Length: 381
Content-Type: application/json

{
"provider_summaries": {
"4cae2ef8-30eb-4571-80c3-3289e86bd65c": {
"resources": {
"VCPU": {
"used": 2,
"capacity": 64
},
"MEMORY_MB": {
"used": 1024,
"capacity": 11374
},
"DISK_GB": {
"used": 2,
"capacity": 49
}
}
}
},
"allocation_requests": [
{
"allocations": [
{
"resource_provider": {
"uuid": "4cae2ef8-30eb-4571-80c3-3289e86bd65c"
},
"resources": {
"VCPU": 1,
"MEMORY_MB": 512,
"DISK_GB": 1
}
}
]
}
]
}

Placement经过一系列查询之后,返回了一些信息,其中allocation_requests就是我们的请求参数,即我们需要这么些资源,麻烦Placement给看看有合适的RP没?然后Placement帮我们找到了UUID为4cae2ef8-30eb-4571-80c3-3289e86bd65c的RP,还很贴心的在provider_summaries列出了这个RP当前使用的资源量以及存量。实际上这两个查询分别对应了下面的两个SQL语句:

-- 1.查询符合要求的Resource Provider
SELECT rp.id
FROM resource_providers AS rp
-- vcpu信息join
-- vcpu总存量信息
INNER JOIN inventories AS inv_vcpu
ON inv_vcpu.resource_provider_id = rp.id
AND inv_vcpu.resource_class_id = %(resource_class_id_1)s
-- vcpu已使用量信息
LEFT OUTER JOIN (
SELECT allocations.resource_provider_id AS resource_provider_id,
sum(allocations.used) AS used
FROM allocations
WHERE allocations.resource_class_id = %(resource_class_id_2)s
GROUP BY allocations.resource_provider_id
) AS usage_vcpu
ON inv_vcpu.resource_provider_id = usage_vcpu.resource_provider_id
-- memory信息join
-- memory总存量信息
INNER JOIN inventories AS inv_memory_mb
ON inv_memory_mb.resource_provider_id = rp.id
AND inv_memory_mb.resource_class_id = %(resource_class_id_3)s
-- memory已使用量信息
LEFT OUTER JOIN (
SELECT allocations.resource_provider_id AS resource_provider_id,
sum(allocations.used) AS used
FROM allocations
WHERE allocations.resource_class_id = %(resource_class_id_4)s
GROUP BY allocations.resource_provider_id
) AS usage_memory_mb
ON inv_memory_mb.resource_provider_id = usage_memory_mb.resource_provider_id
-- disk信息join
-- disk总存量信息
INNER JOIN inventories AS inv_disk_gb
ON inv_disk_gb.resource_provider_id = rp.id
AND inv_disk_gb.resource_class_id = %(resource_class_id_5)s
-- disk已使用量信息
LEFT OUTER JOIN (
SELECT allocations.resource_provider_id
AS resource_provider_id, sum(allocations.used) AS used
FROM allocations
WHERE allocations.resource_class_id = %(resource_class_id_6)s
GROUP BY allocations.resource_provider_id
) AS usage_disk_gb
ON inv_disk_gb.resource_provider_id = usage_disk_gb.resource_provider_id
WHERE
-- vcpu满足上限/下限/步长条件
coalesce(usage_vcpu.used, %(coalesce_1)s) + %(coalesce_2)s <= (
inv_vcpu.total - inv_vcpu.reserved) * inv_vcpu.allocation_ratio AND
inv_vcpu.min_unit <= %(min_unit_1)s AND
inv_vcpu.max_unit >= %(max_unit_1)s AND
%(step_size_1)s % inv_vcpu.step_size = %(param_1)s AND
-- memory满足上限/下限/步长条件
coalesce(usage_memory_mb.used, %(coalesce_3)s) + %(coalesce_4)s <= (
inv_memory_mb.total - inv_memory_mb.reserved) * inv_memory_mb.allocation_ratio AND
inv_memory_mb.min_unit <= %(min_unit_2)s AND
inv_memory_mb.max_unit >= %(max_unit_2)s AND
%(step_size_2)s % inv_memory_mb.step_size = %(param_2)s AND
-- disk满足上限/下限/步长条件
coalesce(usage_disk_gb.used, %(coalesce_5)s) + %(coalesce_6)s <= (
inv_disk_gb.total - inv_disk_gb.reserved) * inv_disk_gb.allocation_ratio AND
inv_disk_gb.min_unit <= %(min_unit_3)s AND
inv_disk_gb.max_unit >= %(max_unit_3)s AND
%(step_size_3)s % inv_disk_gb.step_size = %(param_3)s

-- 2.查询该Resource Provider的用量和存量
SELECT rp.id AS resource_provider_id, rp.uuid AS resource_provider_uuid,
inv.resource_class_id, inv.total, inv.reserved, inv.allocation_ratio,
`usage`.used
FROM resource_providers AS rp
-- inventory信息,每个rp的总量
INNER JOIN inventories AS inv
ON rp.id = inv.resource_provider_id
-- allocation信息
LEFT OUTER JOIN (
-- 每个rp和class的已使用量
SELECT allocations.resource_provider_id AS resource_provider_id,
allocations.resource_class_id AS resource_class_id,
sum(allocations.used) AS used
FROM allocations
WHERE allocations.resource_provider_id IN (%(resource_provider_id_1)s) AND
allocations.resource_class_id IN (
%(resource_class_id_1)s,
%(resource_class_id_2)s,
%(resource_class_id_3)s
)
-- 按照rp_id和rp_class_id进行分组
GROUP BY allocations.resource_provider_id, allocations.resource_class_id
) AS `usage`
ON `usage`.resource_provider_id = inv.resource_provider_id AND
`usage`.resource_class_id = inv.resource_class_id
-- 查询指定id及class的resource
WHERE rp.id IN (%(id_1)s) AND
inv.resource_class_id IN (
%(resource_class_id_4)s,
%(resource_class_id_5)s,
%(resource_class_id_6)s
)

Schedule by fitlers

在nova-scheduler获取到allocation candidates之后,还需要使用FilterScheduler对选取的宿主(候选)节点根据启用的过滤器和权重进行计算和过滤。

目前Nova中实现的调度器有以下几种:

  1. FilterScheduler(过滤调度器):默认载入的调度器,根据指定的过滤条件以及权重挑选最佳节点
  2. CachingScheduler:与FilterScheduler功能类似,只不过为了追求的更高的调度性能,将主机资源信息缓存到本地内存中,目前的master代码中标注为[DEPRECATED]
  3. ChanceScheduler(随机调度器):随机选择,真·佛系。不过也在master代码中被标注了[DEPRECATED]
  4. FakeScheduler:用于测试,无实际功能

But how does filter scheduler work?

我们依然从代码入手,来张序列图先看为敬:

FilterScheduler

FilterScheduler的泳道中,可以看到,大体上分三步:

  1. 调度器缓存刷新、状态更新:通过nova.scheduler.host_manager.HostState来维护内存中一份主机状态,并返回可见的计算节点信息
  2. Filtering:实用配置文件指定各种的filters去过滤掉不符合条件的hosts。在配置文件中有两个配置availale_filtersenabled_filters,前者用于指定所有可用的filters,配置为available_filters=nova.scheduler.filters.all_filters;后者表示对于可用的filter,nova-scheduler会使用哪些,配置如enabled_filters=RetryFilter,AvailabilityZoneFilter,RamFilter,DiskFilter等。O版中Nova支持的filters多达27个,实现均位于nova/scheduler/filters目录下,能够处理各类信息,比如主机可用资源、启动请求的参数(如镜像信息、请求重试次数等)、虚机亲和性和反亲和性(与其他虚机是否在同一宿主节点上)等
  3. Weighing:对所有符合条件的host计算权重并排序,从而选出最佳的一个宿主节点。所有的Weigher实现均位于nova/scheduler/weights目录下,比如DiskWeigher:
class DiskWeigher(weights.BaseHostWeigher):
# 可以设置maxval和minval属性指明权重的最大值和最小值
minval = 0
# 权重的系数,最终排序时需要将每种Weigher得到的权重分别乘上它对应的这个
# 系数,有多个Weigher时才有意义,这里的disk_weight_multiplier
# 配置文件默认值为 1.0
def weight_multiplier(self):
return CONF.filter_scheduler.disk_weight_multiplier
# 计算权重值,按照注释描述,free_disk_mb更大者胜出
def _weigh_object(self, host_state, weight_properties):
"""Higher weights win. We want spreading to be the default."""
return host_state.free_disk_mb

Claim Resources

前面我们提到,在获取到Allocation Candidates(即可用于资源分配的候选host)并经过过滤器过滤和权重计算之后,nova-scheduler开始尝试进行Claim resources,即在创建之前预先测试一下所指定的host的可用资源是否能够满足创建虚机的需求。
我们来一起看一下nova.scheduler.utils.claim_resources的代码:

def claim_resources(ctx, client, spec_obj, instance_uuid, alloc_req,
allocation_request_version=None):
...
return client.claim_resources(ctx, instance_uuid, alloc_req, project_id,
user_id, allocation_request_version=allocation_request_version)

在该方法中,最终调用的还是传入的client的claim_resources()方法,即nova.scheduler.client.report.SchedulerReportClient#claim_resources

@safe_connect
@retries
def claim_resources(self, context, consumer_uuid, alloc_request,
project_id, user_id, allocation_request_version=None):
"""Creates allocation records for the supplied instance UUID against
the supplied resource providers.
即对指定的实例创建该实例在指定RP上的分配记录
:param context: The security context
:param consumer_uuid: The instance's UUID.
:param alloc_request: The JSON body of the request to make to the
placement's PUT /allocations API
:param project_id: The project_id associated with the allocations.
:param user_id: The user_id associated with the allocations.
:param allocation_request_version: The microversion used to request the
allocations.
:returns: True if the allocations were created, False otherwise.
"""
ar = copy.deepcopy(alloc_request)

# If the allocation_request_version less than 1.12, then convert the
# allocation array format to the dict format. This conversion can be
# remove in Rocky release.
if versionutils.convert_version_to_tuple(
allocation_request_version) < (1, 12):
ar = {
'allocations': {
alloc['resource_provider']['uuid']: {
'resources': alloc['resources']
} for alloc in ar['allocations']
}
}
allocation_request_version = '1.12'

url = '/allocations/%s' % consumer_uuid

payload = ar

# We first need to determine if this is a move operation and if so
# create the "doubled-up" allocation that exists for the duration of
# the move operation against both the source and destination hosts
r = self.get(url, global_request_id=context.global_id)
if r.status_code == 200:
current_allocs = r.json()['allocations']
if current_allocs:
payload = _move_operation_alloc_request(current_allocs, ar)

payload['project_id'] = project_id
payload['user_id'] = user_id
r = self.put(url, payload, version=allocation_request_version,
global_request_id=context.global_id)
if r.status_code != 204:
# NOTE(jaypipes): Yes, it sucks doing string comparison like this
# but we have no error codes, only error messages.
if 'concurrently updated' in r.text:
reason = ('another process changed the resource providers '
'involved in our attempt to put allocations for '
'consumer %s' % consumer_uuid)
raise Retry('claim_resources', reason)
else:
LOG.warning(
'Unable to submit allocation for instance '
'%(uuid)s (%(code)i %(text)s)',
{'uuid': consumer_uuid,
'code': r.status_code,
'text': r.text})
return r.status_code == 204

在这里是发起了一个PUT请求,尝试为consumer_id先声明所需要的资源,并根据返回的HTTP status code来判断是否声明资源成功。一旦能成功声明所需要的资源,就等于找到将该虚机调度到哪一个宿主节点,可以继续后面实际资源的创建等一系列流程,Placement API的工作到这里就暂告一段落了。但是对于scheduler,还有去consumer host的资源,即更新host state等内存中的信息等等。

目前社区Placement的发展

通过订阅openstack-dev或者参加nova的weekly meeting,是可以非常及时的获取社区趋势和把握社区的开发进度。那么对Nova Schedule Team来讲,目前这两个月的进度,华为的姜逸坤都给出了比较详尽的记录和整理:

目前看起来,调度相关的team还在紧锣密鼓的继续完善Placement的功能,热火朝天向Rocky版本迈进。

有哪些不足

目前看起来不足主要集中在使用中的bug及功能的待完善。比如目前还在开发的Nested Resource Providers;为获取Allocation candidates增加limit,控制每次取到的资源候选分配者的数量等等;还有比如主机迁移失败导致两个RP中都有占用的情况等等。像把Placement单独抽离出来,这也是社区有意向要做的事情。

参考

[1].Placement API
[2].Placement API Reference
[3].Yikun’s blog